접근 제어 및 로깅 프로그램 with NAT
● 개요
본 프로젝트에서는 로컬 서버의 ~/.ssh/config 파일에 대상 서버(HostName)와 중앙 서버(ProxyJump)를 등록하여
로컬 서버에서 대상 서버에 ssh 접속 시, 중앙 서버를 거쳐 대상 서버에 접속되는 상황을 구현했습니다.
이때 중앙 서버의 방화벽 정책(iptables)을 통하여 대상 서버로의 접근을 허용/차단 할 수 있습니다.
대상 서버로의 접근 허용/차단은 웹 사이트를 통해 설정할 수 있으며,
로컬 서버에서 대상 서버 등록 시,
해당 대상 서버에 .bashrc, log_command.sh 파일을 전송하여 대상 서버에서의 로그를 기록합니다.
● 실행 화면
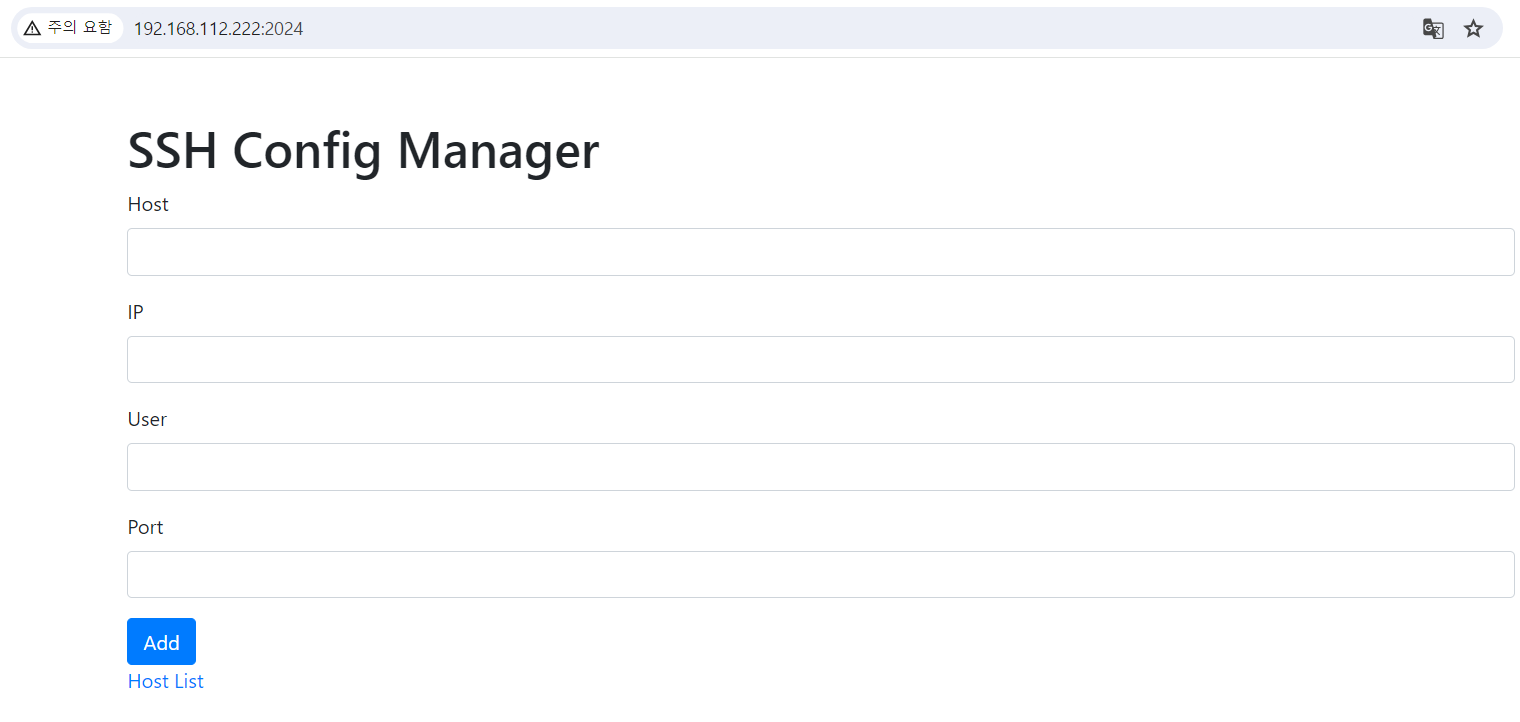
(화면 1) 로컬 서버, 전체 대상 서버 등록
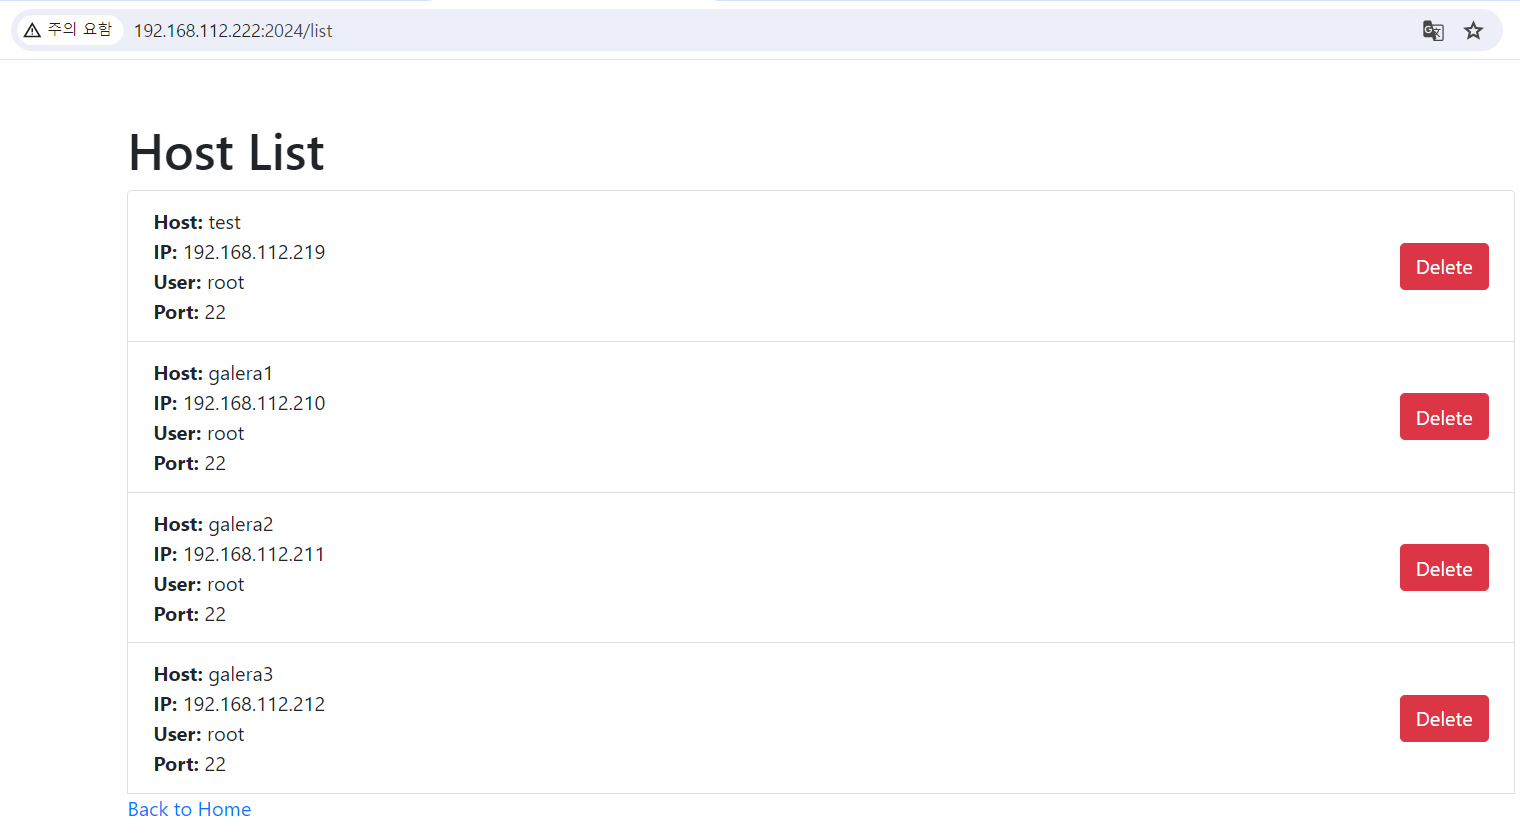
(화면 2) 로컬 서버, 전체 대상 서버 리스트
(화면 3) 중앙 서버, 차단 대상 서버 등록

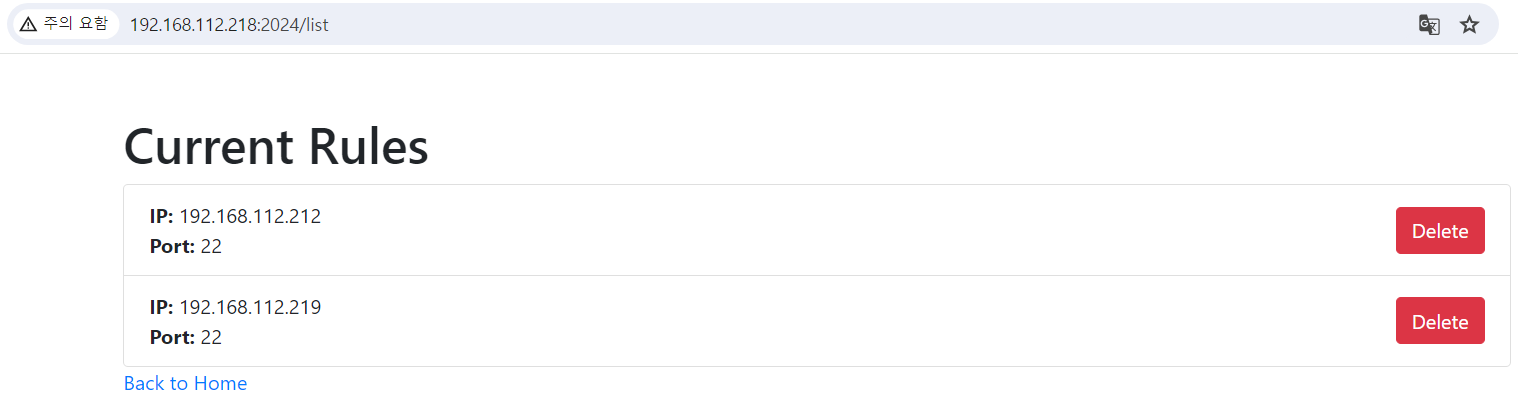
(화면 4) 중앙 서버, 차단 대상 서버 리스트
(방화벽) 중앙 서버
대상 서버 등록, 192.168.112.211

(파일) config
● 환경
(OS) Rocky Linux release 8.10 (Green Obsidian)
(서버 1) 192.168.112.222, 로컬 서버 - 사용자
(서버 2) 192.168.112.218, 중앙 서버 - 관리자, 접근 제어
(a) 로컬 서버
1. 구조
-----------------------------------------------------------------------------------------------------------------------------------------------------------------
local_server/
├── app.py
├── setup_ssh_and_transfer.sh
├── templates/
│ └── home.html
│ └── host_list.htm
├── file/
│ └── bashrc
│ └── logcommand
├── requirements.txt
-----------------------------------------------------------------------------------------------------------------------------------------------------------------
2. 파일
(파일 1) requirements.txt
-----------------------------------------------------------------------------------------------------------------------------------------------------------------
Flask
Flask-SQLAlchemy
-----------------------------------------------------------------------------------------------------------------------------------------------------------------
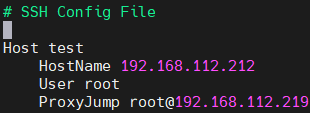
(파일 2) ~/.ssh/config
※ 대상 서버와 중앙 서버(프록시 서버)를 등록하는 파일입니다.
-----------------------------------------------------------------------------------------------------------------------------------------------------------------
Host slave
HostName 192.168.112.220
User root
ProxyJump root@192.168.112.218
Host galera1
HostName 192.168.112.210
User root
ProxyJump root@192.168.112.218
...
-----------------------------------------------------------------------------------------------------------------------------------------------------------------
(파일 3) app.py
-----------------------------------------------------------------------------------------------------------------------------------------------------------------
# Import the libraries
from flask import Flask, render_template, request, redirect, url_for, flash
from flask_sqlalchemy import SQLAlchemy
import os
import subprocess
# Creat Instance
# - app : Flask 인스턴스
app = Flask(__name__)
# Create Secret Key
app.secret_key = 'supersecretkey'
# Configure SQLAlchemy
# - ssh_config.db : 생성할 데이터베이스명
app.config['SQLALCHEMY_DATABASE_URI'] = 'sqlite:///ssh_config.db'
app.config['SQLALCHEMY_TRACK_MODIFICATIONS'] = False
db = SQLAlchemy(app)
# (1) app.config['SQLALCHEMY_DATABASE_URI'] = 'sqlite:///ssh_config.db'
# : SQLAlchemy 클래스 Import and SQLAlchemy 데이터베이스 URI 지정
# (2) db = SQLAlchemy(app) : SQLAlchemy 클래스 인스턴스 생성 및 Flask 인스턴스 app 인수 전달 초기화
# - db : 인스턴스
# Define the database model
# - SSHConfigEntry : 사용자 정의 모델
class SSHConfigEntry(db.Model):
id = db.Column(db.Integer, primary_key=True)
host = db.Column(db.String(80), nullable=False)
hostname = db.Column(db.String(120), nullable=False)
user = db.Column(db.String(80), nullable=False)
port = db.Column(db.String(80), nullable=False)
# (1) db.Model : db.Model 상속받아 데이터베이스 테이블과 매핑
# Initialize the database
# - app_context() : Flask 애플리케이션 컨텍스트
# : 데이터베이스 등의 리소스 접근 시 필요
with app.app_context():
# - create_all() : 함수
# db.create_all() : db.Model 상속받는 모든 모델에 대해 데이터베이스 생성
db.create_all()
# ~/.ssh/config 파일 및 데이터베이스에 새 항목 추가
def add_ssh_config_entry(host, hostname, user):
# - os.path.expanduser() : 실제 경로로 확장
# - os.path.dirname() : 다렉터리 부분만 추출
config_path = os.path.expanduser("~/.ssh/config")
config_dir = os.path.dirname(config_path)
# ~/.ssh 디렉토리가 존재하지 않으면 생성
# - os.path.exists() : 존재 여부 출력(True/False)
if not os.path.exists(config_dir):
# - os.makedirs : 해당 경로 생성
os.makedirs(config_dir)
# ~/.ssh/config 파일이 존재하지 않으면 생성
if not os.path.exists(config_path):
# Write the current config file
with open(config_path, 'w') as config_file:
# 파일 생성 후 기본 내용 작성
config_file.write("# SSH Config File\n")
# 새 항목 추가
new_entry = f"""
Host {host}
HostName {hostname}
User {user}
Port {port}
ProxyJump root@192.168.112.218
"""
# ~/.ssh/config 파일에 새 항목 추가
# Append the current config file
with open(config_path, 'a') as config_file:
config_file.write(new_entry)
# Save to database
# 인스턴스 생성
# - entry : 인스턴스
entry = SSHConfigEntry(host=host, hostname=hostname, user=user)
# - session.add() : 인스턴스를 데이터베이스 세션에 추가
# - session.commit() : 세션에 추가된 모든 변경사항을 데이터베이스에 영구적으로 반영
db.session.add(entry)
db.session.commit()
# 스크립트 실행
run_script_message = run_script(user, ip, port)
# 메시지 반환
flash("Host successfully added to SSH config and database.", "success")
flash(run_script_message, "info")
# 로그 기록 파일 삭제 및 백업 복원
def delete_remote_files_and_restore_backup(remote_user, remote_host, remote_port):
# 기존 파일 삭제 및 백업 파일 존재 시 복원
try:
delete_and_restore_command = f"""
ssh -p {remote_port} {remote_user}@{remote_host} '
if [ -f ./.bashrc ]; then
rm ./.bashrc;
if [ -f ./.bashrc.backup ]; then
mv $(ls -t ./.bashrc. backup | head -1) ./.bashrc;
fi
fi
if [ -f /{remote_user}/log_command.sh ]; then
rm /{remote_user}/log_command.sh;
if [ -f /{remote_user}/log_command. backup]; then
mv $(ls -t /{remote_user}/log_command. backup| head -1) /{remote_user}/log_command.sh;
fi
fi
'
"""
# subprocess.run(['명령어', '옵션' or '매개변수'], 기타 옵션) : 명령어 실행 함
# shell=True : 명령어 실행 시, 셸을 통해 실행하도록 지시
# check=True : 스크립트 비정상 종료 시, CalledProcessError 예외 발생 시키는 옵션
# stdout=subprocess.PIPE : 스크립트의 표준 출력/표준 오류 출력을 파이프로 캡처하는 옵션
# stderr=subprocess.PIPE : 실행 중인 프로세스의 표준 오류 스트림을 파이프로 캡처하는 옵션
# universal_newlines=True : 출력을 텍스트 형식으로 읽도록 설정
# delete_and_restore_command에 저장된 내용 셸로 실행
result = subprocess.run(delete_and_restore_command, shell=True, check=True, stdout=subprocess.PIPE, stderr=subprocess.PIPE, universal_newlines=True)
return "Files successfully deleted and original files restored from backup on remote host."
except subprocess.CalledProcessError as e:
return "Error occurred during file deletion and restoration on remote host."
# ~/.ssh/config 파일 및 데이터베이스에 해당 항목 제거
def delete_ssh_config_entry(entry_id):
# - os.path.expanduser() : 실제 경로로 확장
# - SSHConfigEntry.query.get() : 데이터베이스에서 항목 가져오기
config_path = os.path.expanduser("~/.ssh/config")
entry = SSHConfigEntry.query.get(entry_id)
# 해당 항목 존재 시, ~/.ssh/config 파일에서 제거하기 위해서 그 외 호스트 블록 저장하는 리스트 생성하여 덮어쓰기
if entry:
# Read the current config file
with open(config_path, 'r') as config_file:
# - config_file.readlines() : 파일의 모든 라인을 리스트로 읽어들이기
lines = config_file.readlines()
# ~/.ssh/config 파일에서 삭제할 항목 찾기
# 해당 line이 삭제할 항목이 아닐 경우(skip = False일 경우) new_lines에 저장
new_lines = []
skip = False
for line in lines:
# - startswith() : 문자열이 특정 접두사로 시작하는지 확인
if line.startswith(f"Host {entry.host}"):
skip = True
# - line.strip() == "" : 양쪽의 모든 공백 제거 후, 문자열 비었는지 확인
# : 호스트 블록의 끝으로 식별하여 다음 호스트 블록 처리하기 위한 것
if skip and line.strip() == "":
skip = False
continue
if not skip:
new_lines.append(line)
# Write the new config back to the file
# : 생성한 new_lines으로 덮어쓰기
with open(config_path, 'w') as config_file:
config_file.writelines(new_lines)
# delete_remote_files_and_restore_backup() 함수 실행
delete_message = delete_remote_files_and_restore_backup(entry.user, entry.ip, entry.port)
flash(delete_message, "info")
# Remove from the database
# - session.delete() : 인스턴스를 데이터베이스 세션에서 제거
# - session.commit() : 세션에 추가된 모든 변경사항을 데이터베이스에 영구적으로 반영
db.session.delete(entry)
db.session.commit()
# 메세지 반환
return f"Entry {entry.host} deleted from {config_path} and database."
else:
return "Entry not found."
# 스크립트 실행
def run_script(remote_user, remote_host, remote_port):
try:
# subprocess.run(['명령어', '옵션' or '매개변수'], 기타 옵션) : 명령어 실행 함
# check=True : 스크립트 비정상 종료 시, CalledProcessError 예외 발생 시키는 옵션
# stdout=subprocess.PIPE : 스크립트의 표준 출력/표준 오류 출력을 파이프로 캡처하는 옵션
# universal_newlines=True : 출력을 텍스트 형식으로 읽도록 설정
# Bash 스크립트(setup_ssh_and_transfer.sh) 실행
result = subprocess.run(['./setup_ssh_and_transfer.sh', remote_user, remote_host, str(remote_port)], check=True, stdout=subprocess.PIPE, stderr=subprocess.PIPE, universal_newlines=True)
# 표준 출력 및 표준 오류 출력
return "SSH key exchange and file transfer completed."
except subprocess.CalledProcessError as e:
return "Error occurred during script execution."
# route
@app.route('/')
def home():
# - render_template() : HTML 템플릿 파일 렌더링하여 클라이언트에게 반환
# - 렌더링 : 템플릿 파일(ex. HTML)을 실제로 브라우저에 표시할 수 있는 완성된 웹 페이지로 변환하는 과정
return render_template('home.html')
@app.route('/list')
def host_list() :
# - query.all() : 데이터베이스 모델(SSHConfigEntry)에서 모든 항목 가져오기
entries = SSHConfigEntry.query.all()
# - entries=entries : entries를 템플릿에 전달하여 화면에 표시
return render_template('host_list.html', entries=entries)
# methods=['POST'] : POST 요청 처리
@app.route('/add', methods=['POST'])
def add_entry():
# - host/ip/user/port = request.form['host/ip/user/port']
# : HTTP POST 요청에서 폼 데이터로 전송된 'host/ip/user/port' 필드의 값을 가져오기
host = request.form['host']
ip = request.form['ip']
user = request.form['user']
port = request.form['port']
# add_ssh_config_entry() 사용자 정의 함수 실행 및 반환된 메시지 저장
message = add_ssh_config_entry(host, ip, user, port)
# 플래시 메시지로, 웹페이지에 표시
flash(message)
# - redirect() : 리다이렉션
# - url_for() : 경로 지정
return redirect(url_for('home'))
@app.route('/delete/<int:entry_id>', methods=['POST'])
def delete_entry(entry_id):
# delete_ssh_config_entry() 사용자 정의 함수 실행 및 반환된 메시지 저장
message = delete_ssh_config_entry(entry_id)
flash(message)
return redirect(url_for('host_list'))
# 어플리케이션 실행
# - if __name__ == '__main__': 해당 스크립트가 직접 실행도리 때만 아래의 코드 실행
# - run() : 어플리케이션을 로컬 개발 서버에서 실행
if __name__ == '__main__':
app.run(host='0.0.0.0', port=2024)
-----------------------------------------------------------------------------------------------------------------------------------------------------------------
(파일 4) home.html
-----------------------------------------------------------------------------------------------------------------------------------------------------------------
<!doctype html>
<html lang="en">
<head>
<meta charset="utf-8">
<meta name="viewport" content="width=device-width, initial-scale=1, shrink-to-fit=no">
<title>SSH Config Manager</title>
<link rel="stylesheet" href="https://stackpath.bootstrapcdn.com/bootstrap/4.3.1/css/bootstrap.min.css">
</head>
<body>
<div class="container">
<h1 class="mt-5">SSH Config Manager</h1>
<form action="{{ url_for('add_entry') }}" method="post">
<div class="form-group">
<label for="host">Host</label>
<input type="text" class="form-control" id="host" name="host" required>
</div>
<div class="form-group">
<label for="ip">IP</label>
<input type="text" class="form-control" id="ip" name="ip" required>
</div>
<div class="form-group">
<label for="user">User</label>
<input type="text" class="form-control" id="user" name="user" required>
</div>
<div class="form-group">
<label for="port">Port</label>
<input type="text" class="form-control" id="port" name="port" required>
</div>
<button type="submit" class="btn btn-primary">Add</button>
</form>
<a href="{{ url_for('host_list') }}">Host List</a>
{% with messages = get_flashed_messages() %}
{% if messages %}
<div class="alert alert-success mt-3" role="alert">
{{ messages[0] }}
</div>
{% endif %}
{% endwith %}
</div>
</body>
</html>
-----------------------------------------------------------------------------------------------------------------------------------------------------------------
(파일 5) host_list.html
----------------------------------------------------------------------------------------------------------------------------------------------------------------- <!doctype html>
<html lang="en">
<head>
<meta charset="utf-8">
<meta name="viewport" content="width=device-width, initial-scale=1, shrink-to-fit=no">
<title>SSH Config Manager</title>
<link rel="stylesheet" href="https://stackpath.bootstrapcdn.com/bootstrap/4.3.1/css/bootstrap.min.css">
</head>
<body>
<div class="container">
<h1 class="mt-5">Host List</h1>
<ul class="list-group">
{% for entry in entries %}
<li class="list-group-item d-flex justify-content-between align-items-center">
<div>
<strong>Host:</strong> {{ entry.host }}<br>
<strong>IP:</strong> {{ entry.ip }}<br>
<strong>User:</strong> {{ entry.user }}<br>
<strong>Port:</strong> {{ entry.port }}
</div>
<form method="post" action="{{ url_for('delete_entry', entry_id=entry.id) }}">
<button type="submit" class="btn btn-danger">Delete</button>
</form>
</li>
{% endfor %}
<a href="{{ url_for('home') }}">Back to Home</a>
</ul>
</div>
</body>
</html>
-----------------------------------------------------------------------------------------------------------------------------------------------------------------
(파일 6) setup_ssh_and_transfer.sh
-----------------------------------------------------------------------------------------------------------------------------------------------------------------
#!/bin/bash
# 인자로 받은 변수 설정
REMOTE_USER=$1
REMOTE_HOST=$2
REMOTE_PORT=$3
FILE_TO_TRANSFER1="/home/local_server/file/bashrc"
FILE_TO_TRANSFER2="/home/local_server/file/logcommand"
REMOTE_PATH1="./.bashrc"
REMOTE_PATH2="/$REMOTE_USER/log_command.sh"
BACKUP_SUFFIX=".backup"
# SSH 키가 이미 있는지 확인하고 없으면 생성
if [ ! -f ~/.ssh/id_rsa ]; then
echo "SSH 키를 생성 중..."
ssh-keygen -t rsa -b 2048 -N "" -f ~/.ssh/id_rsa
fi
# SSH 키를 원격 서버로 복사
echo "SSH 키를 원격 서버로 복사 중..."
ssh-copy-id -i ~/.ssh/id_rsa.pub -p $REMOTE_PORT $REMOTE_USER@$REMOTE_HOST
# 원격 서버에서 기존 파일 백업 및 새 파일 전송
echo "파일을 원격 서버로 전송 중..."
ssh -p $REMOTE_PORT $REMOTE_USER@$REMOTE_HOST "
# .bashrc 파일이 존재하면 백업
if [ -f $REMOTE_PATH1 ]; then
mv $REMOTE_PATH1 ${REMOTE_PATH1}${BACKUP_SUFFIX}
echo '.bashrc 파일이 ${REMOTE_PATH1}${BACKUP_SUFFIX}로 백업되었습니다.'
fi
# log_command.sh 파일이 존재하면 백업
if [ -f $REMOTE_PATH2 ]; then
mv $REMOTE_PATH2 ${REMOTE_PATH2}${BACKUP_SUFFIX}
echo 'log_command.sh 파일이 ${REMOTE_PATH2}${BACKUP_SUFFIX}로 백업되었습니다.'
fi
"
# 파일을 원격 서버로 전송
echo "파일을 원격 서버로 전송 중..."
scp -P $REMOTE_PORT $FILE_TO_TRANSFER1 $REMOTE_USER@$REMOTE_HOST:$REMOTE_PATH1
scp -P $REMOTE_PORT $FILE_TO_TRANSFER2 $REMOTE_USER@$REMOTE_HOST:$REMOTE_PATH2
echo "SSH 키 교환 및 파일 전송이 완료되었습니다!"
-----------------------------------------------------------------------------------------------------------------------------------------------------------------
(파일 7) file/bashrc
-----------------------------------------------------------------------------------------------------------------------------------------------------------------
# .bashrc
# User specific aliases and functions
alias rm='rm -i'
alias cp='cp -i'
alias mv='mv -i'
# Source global definitions
if [ -f /etc/bashrc ]; then
. /etc/bashrc
fi
# 프록시 서버 IP 주소
SPECIFIC_SERVER_IP="192.168.112.218"
# SSH 접속 여부와 접속한 서버의 IP 주소 확인
if [[ -n "$SSH_CLIENT" ]] || [[ -n "$SSH_TTY" ]]; then
# 접속한 서버의 IP 주소 가져오기
SSH_CONNECTION_INFO=$(echo $SSH_CLIENT | awk '{print $1}')
if [[ "$SSH_CONNECTION_INFO" == "$SPECIFIC_SERVER_IP" ]]; then
export HISTFILE=~/.bash_history_$(date +%Y%m%d%H%M%S)
export PROMPT_COMMAND='history -a; bash ~/log_command.sh'
fi
fi
-----------------------------------------------------------------------------------------------------------------------------------------------------------------
(파일 8) file/logcommand
-----------------------------------------------------------------------------------------------------------------------------------------------------------------
#!/bin/bash
# 현재 세션의 마지막 명령어 가져오기
LAST_COMMAND=$(history | tail -n 1 | sed 's/^[ ]*[0-9]\+[ ]*//')
# 명령어가 비어있지 않으면 로컬 서버로 전송
if [[ ! -z "$LAST_COMMAND" ]]; then
echo "$LAST_COMMAND" | ssh user@local_server 'cat >> /path/to/destination/commands.log'
fi
-----------------------------------------------------------------------------------------------------------------------------------------------------------------
3. 실행
Step1. 선수 작업 진행
1-1) python3 설치
# yum install -y python3
1-2) 최신 패키지 업데이트
# yum -y update
1-3) pip3 패키지
(만약 pip3가 설치되어 있지 않다면, # dnf install python3-pip -y 명령어를 통해 설치한다.)
# pip3 install --upgrade pip
# pip3 install gunicorn
Step2. 방화벽 설정
# firewall-cmd --permanent --add-port=2024/tcp
# firewall-cmd --reload
Step3. 작업 디렉토리 이동
Step4. 필수 패키지 설치
# pip3 install -r requirements.txt
Step5. 실행
# gunicorn -w 4 -b 0.0.0.0:2024 app:app
4. 로깅 및 확인
# ls ~/.bash_history_*
/root/.bash_history_20240618162741
# vi /root/.bash_history_20240618162741
(b) 중앙 서버 (프록시 서버)
1. 구조
-----------------------------------------------------------------------------------------------------------------------------------------------------------------
proxy_server/
├── app.py
├── templates/
│ └── home.html
│ └── rule_list.html
├── requirements.txt
-----------------------------------------------------------------------------------------------------------------------------------------------------------------
2. 파일
(파일 1) requirements.txt
-----------------------------------------------------------------------------------------------------------------------------------------------------------------
Flask
Flask-SQLAlchemy
-----------------------------------------------------------------------------------------------------------------------------------------------------------------
(파일 2) app.py
-----------------------------------------------------------------------------------------------------------------------------------------------------------------
from flask import Flask, render_template, request, redirect, url_for, flash
from flask_sqlalchemy import SQLAlchemy
import subprocess
app = Flask(__name__)
app.secret_key = 'supersecretkey'
app.config['SQLALCHEMY_DATABASE_URI'] = 'sqlite:///iptables_rules.db'
db = SQLAlchemy(app)
class Rule(db.Model):
id = db.Column(db.Integer, primary_key=True)
ip = db.Column(db.String(15), unique=True, nullable=False)
with app.app_context():
db.create_all()
# 특정 IP 방화벽 정책 추가
def allow_iptables_rule(ip, port):
try:
command1 = f"sudo iptables -I INPUT -s {ip} -d 192.168.112.218 -j ACCEPT"
command2 = f"sudo iptables -I OUTPUT -s 192.168.112.218 -d {ip} -p tcp --dport {port} -j ACCEPT"
# - subprocess.check_call() : 시스템 셸을 통해 명령어 실행
subprocess.check_call(command1, shell=True)
subprocess.check_call(command2, shell=True)
# Save to database
# - new_rule : 새로운 인스턴스 생성
new_rule = Rule(ip=ip, port=port)
# - session.add() : 인스턴스를 데이터베이스 세션에 추가
# - session.commit() : 세션에 추가된 모든 변경사항을 데이터베이스에 영구적으로 반영
db.session.add(new_rule)
db.session.commit()
# 성공 메시지 반환
return f"Rules added for IP/PORT: {ip}/{port}"
# 실패 메시지 반환
except subprocess.CalledProcessError as e:
return f"Failed to add rules: {e}"
# 특정 IP 방화벽 정책 삭제
def delete_iptables_rule(ip, port):
try:
command1 = f"sudo iptables -D INPUT -s {ip} -d 192.168.112.218 -j ACCEPT"
command2 = f"sudo iptables -D OUTPUT -s 192.168.112.218 -d {ip} -p tcp --dport {port} -j ACCEPT"
subprocess.check_call(command1, shell=True)
subprocess.check_call(command2, shell=True)
# - Rule.query.filter_by() : 데이터베이스 필터링
# - .first() : 첫번째 값
# - rule : 인스턴스
rule = Rule.query.filter_by(ip=ip, port=port).first()
if rule:
# db.session.delete() : 인스턴스를 데이터베이스 세션에서 삭제
# - session.commit() : 세션에 추가된 모든 변경사항을 데이터베이스에 영구적으로 반영
db.session.delete(rule)
db.session.commit()
# 성공 메시지 반환
return f"Rules deleted for IP/PORT: {ip}/{port}"
# 실패 메시지 반환
except subprocess.CalledProcessError as e:
return f"Failed to delete rules: {e}"
# route
@app.route('/')
def home():
# - render_template() : HTML 템플릿 파일 렌더링하여 클라이언트에게 반환
# - 렌더링 : 템플릿 파일(ex. HTML)을 실제로 브라우저에 표시할 수 있는 완성된 웹 페이지로 변환하는 과정
return render_template('home.html')
@app.route('/list')
def rule_list():
# - query.all() : 데이터베이스 모델(Rule)에서 모든 항목 가져오기
rules = Rule.query.all()
# - rules=ruless : entries를 템플릿에 전달하여 화면에 표시
return render_template('rule_list.html', rules=rules)
# methods=['POST'] : POST 요청 처리
@app.route('/add', methods=['POST'])
def add_rule():
# - ip/port = request.form['ip/port']
# : HTTP POST 요청에서 폼 데이터로 전송된 'ip/port' 필드의 값을 가져오기
ip = request.form['ip']
port = request.form['port']
# - Rule.query.filter_by() : 데이터베이스 필터링
# - .first() : 첫번째 값
if Rule.query.filter_by(ip=ip, port=port).first():
message = f"Rule already exists for IP/PORT: {ip}/{port}"
else:
# add_iptables_rule() 함수 불러오기
message = add_iptables_rule(ip, port)
# 플래시 메시지로, 웹페이지에 표시
flash(message)
# - redirect() : 리다이렉션
# - url_for() : 경로 지정
return redirect(url_for('home'))
# methods=['POST'] : POST 요청 처리
@app.route('/delete', methods=['POST'])
def delete_rule():
rule_id = request.form['rule_id']
rule = Rule.query.get(rule_id)
# delete_iptables_rule() 사용자 정의 함수 실행 및 반환된 메시지 저장
message = delete_iptables_rule(rule.ip, rule.port)
flash(message)
return redirect(url_for('rule_list'))
if __name__ == '__main__':
app.run(host='0.0.0.0', port=2024)
-----------------------------------------------------------------------------------------------------------------------------------------------------------------
(파일 3) home.html
-----------------------------------------------------------------------------------------------------------------------------------------------------------------
<!doctype html>
<html lang="en">
<head>
<meta charset="utf-8">
<meta name="viewport" content="width=device-width, initial-scale=1, shrink-to-fit=no">
<title>IPTables Rule Manager</title>
<link rel="stylesheet" href="https://stackpath.bootstrapcdn.com/bootstrap/4.3.1/css/bootstrap.min.css">
</head>
<body>
<div class="container">
<h1 class="mt-5">IPTables Rule Manager</h1>
<form action="{{ url_for('add_rule') }}" method="post">
<div class="form-group">
<label for="ip">IP Address:</label>
<input type="text" class="form-control" id="ip" name="ip" required>
</div>
<div class="form-group">
<label for="port">Port:</label>
<input type="text" class="form-control" id="port" name="port" required>
</div>
<button type="submit" class="btn btn-primary">Add</button>
</form>
<a href="{{ url_for('rule_list') }}">Rule List</a>
{% with messages = get_flashed_messages() %}
{% if messages %}
<div class="alert alert-success mt-3" role="alert">
{{ messages[0] }}
</div>
{% endif %}
{% endwith %}
</div>
</body>
</html>
-----------------------------------------------------------------------------------------------------------------------------------------------------------------
(파일 3) rule_list.html
-----------------------------------------------------------------------------------------------------------------------------------------------------------------
<!doctype html>
<html lang="en">
<head>
<meta charset="utf-8">
<meta name="viewport" content="width=device-width, initial-scale=1, shrink-to-fit=no">
<title>IPTables Rule Manager</title>
<link rel="stylesheet" href="https://stackpath.bootstrapcdn.com/bootstrap/4.3.1/css/bootstrap.min.css">
</head>
<body>
<div class="container">
<h1 class="mt-5">Current Rules</h1>
<ul class="list-group">
{% for rule in rules %}
<li class="list-group-item d-flex justify-content-between align-items-center">
<div>
<strong>IP:</strong> {{ rule.ip }}<br>
<strong>Port:</strong> {{ rule.port }}<br>
</div>
<form method="post" action="{{ url_for('delete_rule') }}" style="display:inline;">
<input type="hidden" name="rule_id" value="{{ rule.id }}">
<button type="submit" class="btn btn-danger">Delete</button>
</form>
</li>
{% endfor %}
</ul>
<a href="{{ url_for('home') }}">Back to Home</a>
</div>
</body>
</html>
-----------------------------------------------------------------------------------------------------------------------------------------------------------------
3. 실행
Step1. 선수 작업 진행
1-1) python3 설치
# yum install -y python3
1-2) 최신 패키지 업데이트
# yum -y update
1-3) pip3 패키지
# pip3 install --upgrade pip
# pip3 install gunicorn
Step2. 방화벽 설정
# firewall-cmd --permanent --add-port=2024/tcp
# firewall-cmd --reload
Step3. 작업 디렉토리 이동
Step4. 필수 패키지 설치
# pip3 install -r requirements.txt
Step5. 실행
# gunicorn -w 4 -b 0.0.0.0:2024 app:app
(c) 방화벽
(프록시 서버) 방화벽 기본 세팅
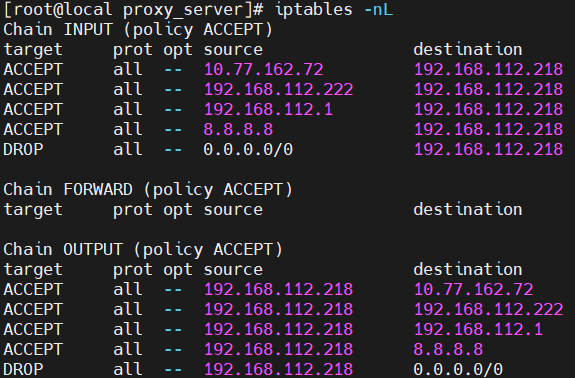
※ 로컬 서버, 게이트웨이, 네임서버(DNS) 허용으로 넣어줍니다.
- INPUT 체인
# iptables -A INPUT -s 10.77.162.72 -d 192.168.112.218 -j ACCEPT
: 10.77.162.72에서 192.168.112.218로 들어오는 모든 트래픽 허용
※ VM 테스트 환경이므로 로컬 컴퓨터(10.77.162.72)와의 방화벽 허용 필요합니다.
# iptables -A INPUT -s 192.168.112.222 -d 192.168.112.218 -j ACCEPT
# iptables -A INPUT -s 192.168.112.1 -d 192.168.112.218 -j ACCEPT
# iptables -A INPUT -s 8.8.8.8 -d 192.168.112.218 -j ACCEPT
# iptables -A INPUT -s 0.0.0.0/0 -d 192.168.112.218 -j DROP
: 전체 차단
- OUTPUT 체인
# iptables -A OUTPUT -s 192.168.112.218 -d 10.77.162.72 -j ACCEPT
: 192.168.112.218에서 10.77.162.72로 나가는 모든 트래픽 허용
# iptables -A OUTPUT -s 192.168.112.218 -d 192.168.112.222 -j ACCEPT
# iptables -A OUTPUT -s 192.168.112.218 -d 192.168.112.1 -j ACCEPT
# iptables -A OUTPUT -s 192.168.112.218 -d 8.8.8.8 -j ACCEPT
# iptables -A OUTPUT -s 192.168.112.218 -d 0.0.0.0/0 -j DROP
: 전체 차단
※ 추후 Docker를 활용해 컨테이너화된 Galera클러스터 구성으로 안정적인 로그 기록 시스템을 구축할 예정입니다.